一个简单的微信小程序-赛博朋克2077倒计时-以及简单的云开发
日期: 2019-07-14 分类: 跨站数据测试 436次阅读
AppID
申请到一个小程序后, 会对应一个AppID
基本目录结构
- cloudfunctions 云函数目录
- miniprogram 开发目录
- README.md 描述项目
- project.config.json 项目配置
cloudfunctions

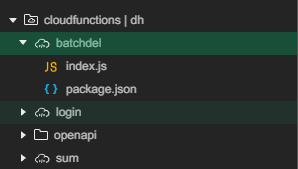
结构如图, 每一个云函数会新建一个目录, index.js为入口, login / openapi 是自带的, 可以获取AppID等
miniprogram

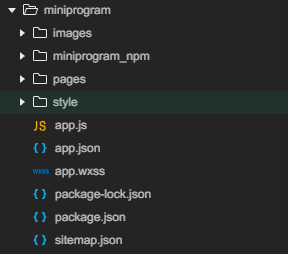
结构如图:
images 存放静态图片
miniprogram_npm 是npm安装的依赖构建node_module后生成的库文件目录
pages 下编写各个界面
style 下存储了一些样式文件
app.js / app.json 分别是程序入口 和主界面配置
以app.json为例
{
  "pages": [
    "pages/imghander/imghander",
    "pages/base/base"
  ],
  "window": {
    "backgroundColor": "#F6F6F6",
    "backgroundTextStyle": "light",
    "navigationBarBackgroundColor": "#faf003",
    "navigationBarTitleText": "Cyberpunk 2077",
    "navigationBarTextStyle": "white"
  },
  "sitemapLocation": "sitemap.json",
  "tabBar": {
    "color": "#000000",
    "selectedColor": "#000000",
    "list": [
      {
        "pagePath": "pages/imghander/imghander",
        "text": "2077",
        "iconPath": "images/film.png",
        "selectedIconPath": "images/film-actived.png"
      },
      {
        "pagePath": "pages/base/base",
        "text": "Cyberpunk",
        "iconPath": "images/profile.png",
        "selectedIconPath": "images/profile-actived.png"
      }
    ]
  }
}
pages属性 定义界面路径, 相当于路由
tabBar属性定义了底栏相关的属性

window属性定义了标题栏的文字和颜色 , 文字颜色navigationBarTextStyle只能是black或white

页面目录 pages
以pages下的base为例

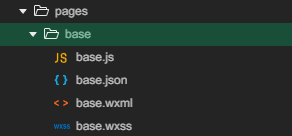
一个页面初始化会包含四个文件
js - > 页面逻辑
json -> 页面配置, 如安装vant库后,  usingComponents 可以引入需要的组件
wxml -> 页面结构
wxss -> 页面样式
下面看一下一个js文件的内容
pages=>页面=>js
以pages=>base=>base.js 为例, 结构如下
// pages/base/base.js
const db = new wx.cloud.database()
Page({
  /**
   * 页面的初始数据
   */
  data: {},

  /**
   * 生命周期函数--监听页面加载
   */
  onLoad: function(options) {},

  /**
   * 生命周期函数--监听页面初次渲染完成
   */
  onReady: function() {},

  /**
   * 生命周期函数--监听页面显示
   */
  onShow: function() {},

  /**
   * 生命周期函数--监听页面隐藏
   */
  onHide: function() {},

  /**
   * 生命周期函数--监听页面卸载
   */
  onUnload: function() {},

  /**
   * 页面相关事件处理函数--监听用户下拉动作
   */
  onPullDownRefresh: function() {},

  /**
   * 页面上拉触底事件的处理函数
   */
  onReachBottom: function() {},

  /**
   * 用户点击右上角分享
   */
  onShareAppMessage: function() {}
})
预置了很多生命周期函数
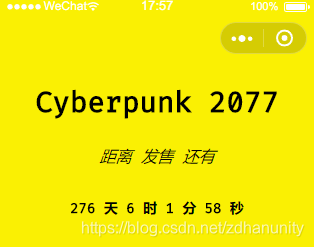
效果

云开发
云开发环境创建的时候, 一个账号可以提供两个环境, 每个环境可以设置id
- 云数据库
json形式数据库, 每一条数据都是json格式的对象 , 与关系型数据库差异如图, 基于mongoDB
关系型数据库更适合表之间有复杂的关联关系, 文档型更适合频繁的读写操作, 效率高一些

包含以下数据类型

在小程序端操作会有权限控制, 而云函数操作则有完全的读写控制
//初始化
const db = wx.cloud.database({env:'dh'}) // 传入环境名

// 插入数据, 可以用毁掉的写法, 也可以用promise写法
// 插入的数据会有 id 主键 和 _openid 标识插入的用户
db.collection('user').add({
	data:{
		name:'dh',
		time: '2019'
	},
	success: res => {
		console.log(res)
	},
	fail: err => {
		console.log(err)
	}
})

// promise写法
db.collection('user').add({
	data:{
		name:'dh',
		time: '2019'
	}
}).then(res => {
	console.log(res)
}).catch(err => {
	console.log(err)
})

// 更新数据, doc拿到记录
db.collection('user').doc('as1h35idf4g56ahafhjioasdf').update({
	data:{
		name:'dh1',
		time: '2019'
	}
})

// 查找
db.collection('user').where({name: 'dh1'}).get()

// 删除  多条数据删除, 需要在云函数进行
db.collection('user').doc('as1h35idf4g56ahafhjioasdf').remove()
-
云函数
云函数, 保存在云 -
云存储
云存储能力
- wx.cloud.uploadFile // 上传
- wx.cloud.downloadFile //下载
- wx.cloud.deleteFile // 删除
- wx.cloud.getTempFileUrl // 临时路径
- …
- …
举个简单的例子-上传
用户打开相册选择图片
wx.chooseImage() // promise 可以拿到文件临时路径
上传至云存储
	wx.cloud.uploadFile({
		...
		filePath: '' // 传入上一步读取的文件临时路径
		...
		...
	}).then(res => {
		console.log(res.fileID)
	})  // promise 可以拿到文件的 fileID
拿到fileID存到云数据库, 便于操作(fileID可以直接用于image组件的src)
	db.collection('image').add({fileID:fileID}) // 在新建的image表中插入记录
	<image src="{fileID}"></image>  //可展示
举个简单的例子-下载
通过data-xxx自定义属性
<button data-fileid="agsyuadi123asda" bindTap="download"> 下载</button>
使得点击的时候通过event获取到文件的fileID, downloadFile方法拿到filePath, 保存到本地
download(e){
	wx.cloud.downloadFile({
		fileID: e.target.dataset.fileid
	}).then(res => {  //
		wx.saveImageToPhotoAlbum({ //保存
			filePath: res.filePath
		})
	})
}
除特别声明,本站所有文章均为原创,如需转载请以超级链接形式注明出处:SmartCat's Blog
标签:整理
精华推荐

