状态管理模式Vuex
日期: 2020-12-07 分类: 跨站数据测试 520次阅读
Vuex是做什么的
-
官方解释:Vuex是一个专为Vue.js应用程序开发的状态管理模式
- 它采用集中式存储管理应用的所有组件的状态,并用相应的规则保证状态以一种可预测的方式发生变化
- Vuex也集成到Vue的官方测试工具devtools extension,提供了诸如零配置的time-travel调试、状态快照导入导出等高级调试功能
-
状态管理是什么:
- 可简单看成把需要多个组件共享的变量全部存储在一个对象里面
- 然后将这个对象放在顶层的Vue实例中,让其他组件可以使用
- 那么多个组件就可以共享这个对象中的所有变量属性(变量用来保存状态)
注:
- 可通过Vue.prototype.$shareObj =shareObj来设置 shareObj为全局对象,但不能做到响应式,如果要自己封装一个全局的响应式对象过于麻烦
- 因此Vuex就是为了提供一个在多个组件间共享状态的插件
Vuex一般用来管理什么状态
-
多个无关系的组件间都需用到的状态:
- 比如用户的登录状态、用户名称、头像、地理位置信息等
- 比如商品的收藏(在全局对象可直接设置一个收藏数组)、购物车中的物品等
-
某些组件的层级关系太多,通信比较麻烦
注:普通的父子组件通信不用放到Vuex中,否则会让Vuex变得臃肿,不易维护
单界面到多界面状态管理的切换
-
单界面的状态管理:

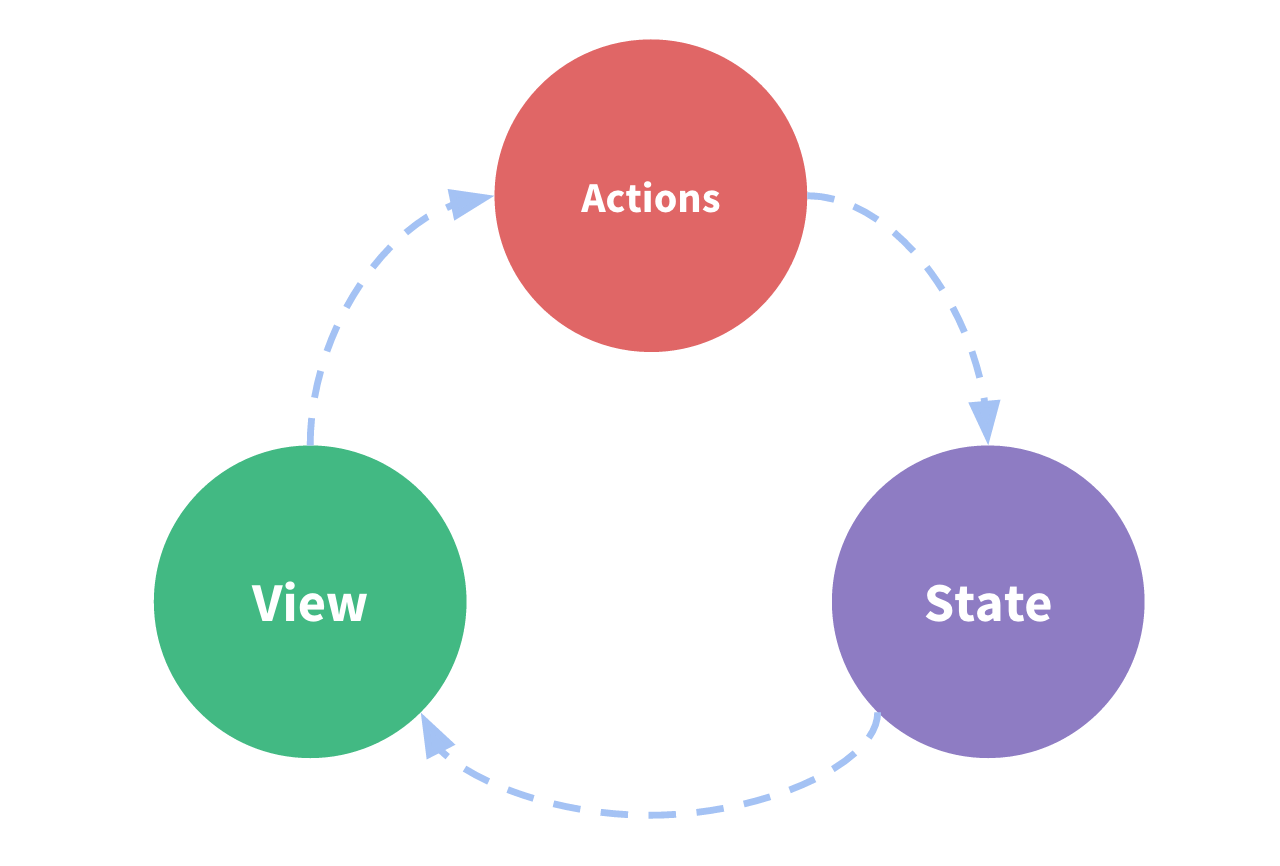
- State:状态,姑且可先当做data中的属性
- View:视图层,可针对State的变化显示不同的信息
- Actions:这里的Actions主要是用户的各种操作:点击、输入等,会导致状态的改变
<tamplate> <div id="app"> <h2>{{counter}}</h2><!-- view--> <button @click="counter++">+</button><!-- actions--> <button @click="counter--">-</button><!-- actions--> </div> </tamplate> <script> export default { name:"App", data() { return { counter: 0,//state } } } </script> -
多界面的状态管理:
当构建vue-clli3项目时可直接勾选Vuex,如果没有勾选可通过命令安装
npm install vuex --save- 首先在src中新建一个store文件夹(如果最初构建项目时勾选了Vuex,会默认有个store文件夹),在src/store/index.js中写入
import Vue from 'vue' import Vuex from 'vuex' //1.安装插件 Vue.use(Vuex) //2.创建对象 const store = new Vuex.Store({ state:{ counter: 1000,//共享状态 }, mutations:{ //方法 increment(state){ state.counter++ }, decrement(state){ state.counter-- }, }, actions:{}, getters:{}, modules:{} }) //3.导出store共享 export default store- 其次在main.js中导入store对象,并放在new Vue中,这样在其他Vue组件中,就可通过this.$store的方式,获取到这个store对象
import Vue from 'vue' import App from './App' import store from './store' Vue.prototype.$store = store //全局 new Vue({ el: '#app', store, render: h => h(App) })- 在其他组件中使用store对象中保存的状态
- 通过this.$store.state.属性的方式来访问状态
- 通过this.$store.commit(‘mutation中方法’)来修改状态
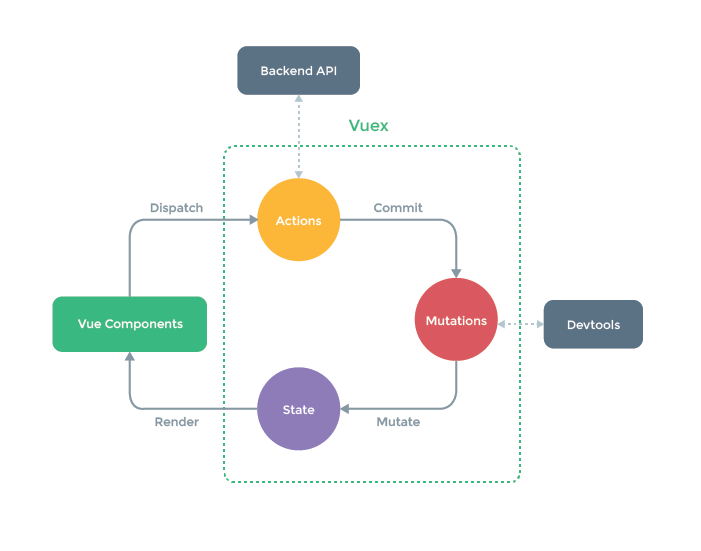
<tamplate> <div id="app"> <h2>{{count}}</h2><!-- view--> <!--<button @click="$store.state.counter++">+</button> <button @click="$store.state.counter--">-</button>--><!--不建议这样直接修改state里面的值,建议按下图所示的箭头顺序来修改,如下所示--> <button @click="addition()">+</button> <button @click="reduce()">-</button>--> </div> </tamplate> <script> export default { name:"App", computed: { count: function(){ return this.$store.state.count } }, methods: { addition() { this.$store.commit('increment') }, reduce(){ this.$store.commit('decrement') } } } </script>Vuex的基本思想就是将共享的状态抽取出来,交给Vuex统一进行管理,并按其规定好的规则,进行访问和修改等操作

注:
- Devtools为vue开发的一个浏览器插件,可追踪每次修改state状态的操作
- Devtools只能追踪同步操作,所以异步操作放Actions中处理,如果无异步操作,可跳过Actions这一步骤
- 我们通过提交mutation的方式,而非直接改变$store.state.count,这是因为Vuex可以更明确的追踪状态的变化
Vuex核心概念
- State
- Getters
- Mutation
- Action
- Module
-
State单一状态树
- 单一状态树即单一数据源
- 如果你的状态信息是保存到多个Store对象中的,那么之后的管理和维护等等都会变得特别困难
- 所以Vuex使用单一状态树来管理应用层级的全部状态,即所有状态都写在同一个Store对象中统一管理
-
Getters基本使用
- 类似于组件中的计算属性
- 在src/store/index.js中
import Vue from 'vue'
import Vuex from 'vuex'

//1.安装插件
Vue.use(Vuex)

//2.创建对象
const store = new Vuex.Store({
    state:{
        counter: 1000,//共享状态
        students: [
            {id:110, name:'why', age:18},
            {id:111, name:'kobe', age:24},
            {id:112, name:'james', age:30},
            {id:113, name:'curry', age:10},
        ]
    },
    mutations:{
        //方法
        increment(state){
            state.counter++
        },
        decrement(state){
            state.counter--
        },
    },
    actions:{},
    getters:{
        powerCounter(state){
            return state.counter * state.counter
        },
        //获取年龄大于20岁的学生
        moretwenty(state){
            return state.students.filter(s => s.age > 20)
        },
        //获取年龄大于20岁的学生个数
        moretwentylength(state, getters){
    		return getters.moretwenty.length
		},
        //获取年龄大于age的学生
        moreageStu(state){
            //return function(age) {
    			//return state.students.filter(s => s.age > age)
			//}
            return age => {
                return state.students.filter(s => s.age > age)
            }
            //getters默认是不能传递参数的,如果希望传递参数,那么只能让getters本身返回另一个函数
        },
    },
    modules:{}
})

//3.导出store共享
export default store
- 在单个组件中
<tamplate>
    <div id="app">
        <h2>{{$store.state.counter}}</h2>
        <h2>{{$store.getters.powerCounter}}</h2>
        <h2>{{$store.getters.moretwenty}}</h2>
        <h2>{{$store.getters.moretwentylength}}</h2>
        <h2>{{$store.getters.moreageStu(8)}}</h2>
    </div>
</tamplate>
<script>
export default {
    name:"App",
}
</script>
-
mutations的携带参数
- Vuex的store状态的更新唯一方式:提交mutation
- mutation主要包括两个部分:字符串的事件类型(type),一个回调函数(handler),该回调函数的第一个参数就是state
- 携带的参数被称为payload(载荷)
- 一般有很多参数需要传递,通常以对象的形式传递,然后再从对象中取出相关信息
-
Vuex数据响应式原理
- Vuex的store中的state是响应式的,当state中的数据发生改变时, Vue组件会自动更新
- 如果想要修改state中已经定义好的属性,因为这些属性都会被加入到响应式系统中,响应式系统会监听属性的变化,当属性发生变化时,会自动通知所有页面中用到该属性的地方,让页面进行刷新
- 响应规则:
- 提前在store里面初始化好所需属性
- 当给state中的对象添加新属性时,使用下面的方式
- 使用Vue.set(obj, ‘newProp’, 123)
- 用新对象给旧对象重新赋值
- 在src/store/index.js中
import Vue from 'vue'
import Vuex from 'vuex'

//1.安装插件
Vue.use(Vuex)

//2.创建对象
const store = new Vuex.Store({
    state:{
        counter: 1000,//共享状态
        students: [
            {id:110, name:'why', age:18},
            {id:111, name:'kobe', age:24},
            {id:112, name:'james', age:30},
            {id:113, name:'curry', age:10},
        ],
        info: {name:'coco',age: 40,height:1.98 }
    },
    mutations:{
        //方法
        increment(state){
            state.counter++
        },
        decrement(state){
            state.counter--
        },
        //increment,decrement就是事件类型,后面的为回调函数
        //incrementCount(state,count){
            //state.counter += count
        //},
        incrementCount(state,payload){
            state.counter += payload.count
        },
        addStudent(state,stu){
            state.students.push(stu)
        },
        updateInfo(state){
    		//state.info['address'] = '洛杉矶'
            //虽然state能增加这个属性,但界面不会发生刷新,因为这不在响应式系统中
            Vue.set(state.info,'address','洛杉矶')

            //删除信息,该方法也不能做到响应式
            //delete state.info.age
            Vue.delete(state.info, 'age')
		}
    },
    actions:{},
    getters:{},
    modules:{}
})

//3.导出store共享
export default store
- 在单个组件中
<tamplate>
    <div id="app">
        <h2>{{$store.state.counter}}</h2>
        <button @click="addCount(5)">+5</button>
        <button @click="addCount(10)">+10</button>
        <button @click="addStudent()">添加学生</button>
        <h2>{{$store.state.info}}</h2>
        <button @click="updateInfo">修改信息</button>
    </div>
</tamplate>
<script>
export default {
    name:"App",
    methods:{
        addCount(count) {
            //普通的提交封装
        	//this.$store.commit('incrementCount',count)

            //特殊的提交封装
            this.$store.commit({
                type: 'incrementCount',
                count
            })
		},
        addStudent(){
            const stu = {id:114, name:'alan', age:35}
            this.$store.commit('addStudent',stu)
        },
        updateInfo(){
            this.$store.commit('updateInfo')
        }
    }
</script>
-
Mutation常量类型
- 在mutation中,我们定义了很多事件类型(也就是其中的方法名称)
- 当我们的项目增大时, Vuex管理的状态越来越多,需要更新状态的情况越来越多,那么意味着Mutation中的方法越来越多
- 方法过多,使用者需要花费大量的经历去记住这些方法甚至是多个文件间来回切换查看方法名称,甚至如果不是复制的时候可能还会出现写错的情况
- 因此把这些事件类型都抽成常量
- 在store中新建mutations-types.js文件
export const INCREMENTCOUNT = ‘incrementCount'
- 在src/store/index.js中
import Vue from 'vue'
import Vuex from 'vuex'
import {
    INCREMENTCOUNT
}from './store/mutations-types'

//1.安装插件
Vue.use(Vuex)

//2.创建对象
const store = new Vuex.Store({
    state:{
        counter: 1000,//共享状态
    },
    mutations:{
        //方法
        [INCREMENTCOUNT](state,payload){//可加单引号
            state.counter += payload.count
        },
    },
    actions:{},
    getters:{},
    modules:{}
})

//3.导出store共享
export default store
- 在单个组件中
<tamplate>
    <div id="app">
        <h2>{{$store.state.counter}}</h2>
        <button @click="addCount(5)">+5</button>
        <button @click="addCount(10)">+10</button>
    </div>
</tamplate>
<script>
//import INCREMENTCOUNT from './store/mutations-types'
//不能同上这样导入,只有export default时才能同上导入,而普通的导出方式只能如下导入
import {
    INCREMENTCOUNT
}from './store/mutations-types'
export default {
    name:"App",
    methods:{
        addCount(count) {
        	this.$store.commit(INCREMENTCOUNT,count)
		},
    }
</script>
-
actions的使用详解
-
通常情况下,Vuex要求我们Mutation中的方法必须是同步方法
- 主要原因是当我们使用Devtools时,它可以帮我们捕捉mutation快照
- 但如果是异步操作,那么Devtools将不能很好的追踪这个操作什么时候会被完成
//如下例,在src/store/index.js中修改updateInfo函数 updateInfo(state){ //state.info.name = 'coderwhy' setTimeout(() => { state.info.name = 'coderwhy' },1000) //执行代码后发现,页面中的数据更改了,但是Devtools中的数据没有更改,也就是说没有追踪到状态变化 } -
所以强调,不要在Mutation中进行异步操作
- 但某些情况,希望在Vuex中进行一些异步操作,比如网络请求,必然是异步的,就可以通过Action来代替Mutation进行异步操作
//在src/store/index.js中
mutations:{
    updateInfo(state){
        state.info.name = 'coderwhy'
    },
},
actions: {
    //context可以理解为store对象,但不能直接通过context.state.info.name更改值,因为更改值必须通过mutation,不能直接跳过
	//aUpdateInfo(context,payload) {
		//setTimeout(() => {
            //context.commit('updateInfo')
            //console.log(payload.message)
            //payload.success()
        //},1000)
	//}
    aUpdateInfo(context,payload) {
		return new Promise((resolve,reject) => {
			setTimeout(() => {
            	context.commit('updateInfo')
            	console.log(payload)
            	resolve('11111')
        	},1000)
        })
	}
}

//在单个组件中
updateInfo(){
    //this.$store.dispatch('aUpdateInfo',{
        //message:"我是携带的信息",
        //success:() => {
            //console.log('里面修改成功了')
        //}
    //})
    this.$store.dispatch('aUpdateInfo','我是携带的信息').then(res => {
        console.log('里面修改成功了')
        console.log(res)
    })
}

//两种方法都可以
-
-
modules的使用详解
-
当应用变得复杂时,store对象就有可能变得相当臃肿,所以Vuex允许我们将store分割成模块,而每个模块拥有自己的state,mutations,actions,getters等
import Vue from 'vue'
import Vuex from 'vuex'

//1.安装插件
Vue.use(Vuex)

//2.创建对象
const moduleA = {
    state: {
        name:'zhangsan',
        //其他组件可通过{{$store.state.a.name}}来获取
    },
    mutations: {
        updateName(state,payload) {
            state.name = payload
        }
        //其他组件可通过updateName(){this.$store.commit('updateName','lisi')}调用
    },
    actions: {
        aUpdateName(context) {
            setTimeout(() => {
                console.log(context)//可打印看看,里面有很多东西
                context.commit('updateName','wangwu')
                //这里的commit只调用本模块的mutations方法
            },1000)
        }
        //其他组件可通过aUpdateName(){this.$store.dispatch('aUpdateName')}调用
    },
    getters: {
        fullname(state) {
            return state.name + '111'
        },
        //其他组件可通过{{$store.getters.fullname}}来调用
        fullname2(state,getters) {
            return getters.fullname + '222'
        },
        //想引用store对象的state状态(根状态)
        fullname3(state,getters,rootState) {
            return getters.fullname2 + rootState.counter
        },
    }
}
const store = new Vuex.Store({
    state:{
        counter: 1000,//共享状态
    },
    mutations:{
        //方法
        incrementCount(state,payload){
            state.counter += payload.count
        },
    },
    actions:{},
    getters:{},
    modules:{
        a: moduleA//会自动放到state中
    }
})

//3.导出store共享
export default store
-
-
对象的解构
-
什么是对象的解构
const obj = { name:'why', age: 18, height:1.98, address: '洛杉矶' } const {name,height,age} = obj //依然按照名字进行分配,如果有更多属性,只取对应的就好了 -
局部状态通过context.state暴露出来,根节点状态则为context.rootState
const moduleA = { //..... actions: { aUpdateName({state,commit,rootState}) { setTimeout(() => { commit('updateName','wangwu') },1000) } }, } -
如果getters中也需要使用全局的状态,可以接受更多的参数
const moduleA = {
	//....
	getters: {
        fullname({state,getters,rootState}) {
            return state.name + rootState.name
        },
    }
}
-
-
store文件夹的目录结构
- 即将对应store属性抽出单独的文件,export default导出,在src/store/index.js中分别导入
- store
- index.js:我们组装模块并导出store的地方
- actions.js:根级别的action
- mutations.js:根级别的mutation
- modules
- cart.js:购物车模块
- products.js:产品模块
除特别声明,本站所有文章均为原创,如需转载请以超级链接形式注明出处:SmartCat's Blog
标签:vue vue
精华推荐

